Dev Log 4 - Implementing Graphics
2024-12-20 - [53] 10:5
This post will have some animated GIF files, which the Lagrange gemini client seems to have some issues displaying, at least for me. My apologies for that.
I wanted to write this a few days ago, but I decided instead to reimplement some of the code I was writing to make it more efficient, cleaner, and a LOT easier to maintain.
An important part of Game Boy games is displaying graphics on its "Dot Matrix Display" (When you see "DMG" in relation to the Game Boy, that's what it means). Its video specs are very modest, with only 2 bits of color (4 shades of gray... well, crappy shades of green (I stole that joke from "The Ultimate Game Boy Talk", linked below, but it's quite true)) and a resolution of 160 pixels wide by 144 pixels high.
While the LCD is enabled, the Game Boy runs at basically 60fps (technically it runs at 2^22/70224 fps, which is about 59.7275fps). This frame rate is a little bit faster on the Super Game Boy, a Super Nintendo cartridge that allowed you to play Game Boy games on the Super Nintendo, which is talked about in the video linked below that very recently came out.
It is HIGHLY recommended that you check out BOTH of the videos I linked above if you are interested in the technical details of the Game Boy, especially how graphics work. My post will not be going into too much detail about that and instead will talk about what I personally needed to do in order to get graphics to play nicely on while doing this Game Boy development.
Drawing cards to the screen
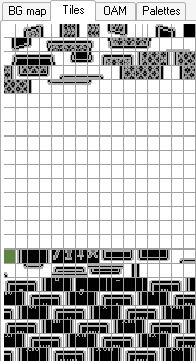
In order to display tarot spreads on the Game Boy, I have to load tiles into VRAM (Video RAM). If I want to display the tiles on a background layer, I need to load the tile index that's already in VRAM to another specific location in VRAM. If I want to display tiles as sprites, I need to set values in OAM (Object Attribute Memory). Below is an image of tile data loaded into VRAM.
Unfortunately I can't really touch VRAM or OAM during a frame (there are some exceptions, like for a few CPU cycles immediately after a scanline is drawn, but at this point, I'm not bothering with HBlank (Horizontal Blank) timing), so I need to load things into VRAM and OAM during VBlank (Vertical Blank). It takes time after the 144th scanline is drawn before the 1st scanline starts being drawn on the screen. That time is about 10 scanlines per frame, or about 1087 microseconds or 1.087 milliseconds. In terms of CPU Clock cycles, that's 4560 clock cycles... and considering each CPU instruction on the Game Boy takes at least 4 CPU cycles to run (and always a multiple of 4 CPU cycles), I can run at the very most 1140 CPU instructions during VBlank if they all took only 4 CPU cycles each (only a few take that few).
Because of this time limitation, I can only load a few bytes of data into VRAM per frame, and I need to be efficient during that time. I also have to load data into OAM during that small amount of time as well. My solutions are to have a "draw buffer" and "shadow OAM" that I update at any point, especially during the 144 scanlines (about 15656 microseconds or 15.656 milliseconds) of time I have during the frame, then at the start of VBlank, I IMMEDIATELY load the shadow OAM into the actual OAM and load the data in the draw buffer into VRAM. This lets me finish both actions before VBlank is over and I don't have safe access writing VRAM or OAM anymore.
The draw buffer is a chunk of WRAM (Work RAM) with sets of 3 bytes, the first 2 being an address in VRAM to load a value into and the third byte being the value to load into that VRAM address. The shadow OAM is a chunk of WRAM that contains all of the sprite data (indexes to tiles along with Y and X coordinates and attributes like whether the sprite is flipped or which of 2 sprite palettes are used).
The image below shows the draw buffer with 16 VRAM addresses and 16 values specified. The VRAM addresses are highlighted in blue and the value that will go into that VRAM address is highlighted immediately after in orange.
The result after transferring the draw buffer data to VRAM is shown in the image below.
Technically, I left some info out. Each tile is 16 bytes in length, so I can't load too many tiles into VRAM each frame. The VRAM timing limitations do go away though while the Game Boy's LCD is turned off, which I take advantage of to load all of the tiles into VRAM much quicker than only a few at a time. It's much more economical for me to write tile index values (the offset of the tile in VRAM) to the areas of VRAM I need to in order to display the tile on the background layer than it is for me to write the tile data itself to VRAM. With that said, I'm using the same code to write data into VRAM from the draw buffer, whether the LCD is on or not.
With the tiles loaded into VRAM, if I want to display a card moving onto the screen and being set down, I need to load tiles onto both the sprite layer and background layer. Sprites have a lot more freedom to move on the screen that tiles on the background layer, as the entire background layer must scroll at the same time if I want to move tiles on the background layer, while individual sprites can move freely from each other or the background layer.
In this project, I want to move a face-down card to a particular position, turn it over, and display a card face-up. That can be seen in the animated gif below.
To do this, I draw the face-down card on the sprite layer by setting the tile indexes into OAM and move all of the sprites of that face-down card together by modifying each of the sprites' X and Y values by the same amount together during each frame of movement. When the face-down card sprites are where I want them to be, I replace all of the sprite tiles with the frame of animation for flipping, then the next frame of animation for flipping, then the next frame of animation for flipping, then I make all of the sprites disappear by moving them out of view of the screen. That is shown in the animated gif below of the sprite layer where instead of the card turning over into a face-up card, it disappears once the last frame of the flipping animation is finished.
On the frame where the sprites disappear, I also draw the face-up card sprites onto the background layer where the sprites were. There are only 12 tiles in this particular case, so I only need to write 12 bytes into VRAM that frame, which is simple with the draw buffer mentioned earlier. The effect of loading the face-up card tiles into the background layer can be seen in the animated gif below of the background layer where the background is blank and then suddenly the face-up card appears.
Conclusion
This post might have seemed like a bit of a rambly mess. I HIGHLY RECOMMEND watching the 2 linked videos, especially "The Ultimate Game Boy Talk" to get more technical details about how graphics on the Game Boy work. This post is mostly about me getting graphics moved into VRAM, moving a card on the screen, and turning it over to reveal a face-up card, all while dealing with incredibly tight time constraints per frame. Concepts like the draw buffer and shadow OAM are quite common for retro game development, as retro console hardware can be quite limiting.
My next goal is to get the Game Boy ROM to handle laying out cards in arbitrary tarot spreads.
Contact/Reply
If you would like to reply to this post, feel free to send me an email.