A gentle guide on getting your Tenstorrent card running on Arch Linux (with the Metalium stack)
Recently I got a message from Tenstorrent's community manager for helping with improving the installation documents. To make it easier for everyone. While that is still in progress, I wanted to document how I got my Tenstorrent card running on Arch Linux (since Tenstorrent officially only supports Ubuntu).
Installing your card
Just plug it into a PCIe slot. Remember to conenct the blower fan. Else the processor gets _really hot_.
Getting the driver running
I have uploaded my PKGBUILD script to the AUR for the kernel mode driver. You can install it via your preferred AUR helper. For me, I run `yay -S tt-kmd-git-dkms`.
After installing. You should see the DKMS module via the `dkms status` command.
❯ dkms status
tt-kmd-git/1.28.r2.g696c047, 6.9.7-arch1-1, x86_64: installed
Now, **REBOOT** you machine. The kernel module should be loaded and you should find a device `/dev/tenstorrent/0`. (Yeah, there should be a way to load the module without rebooting but I haven't figured it out yet.)
❯ ls /dev/tenstorrent/0
/dev/tenstorrent/0
And now you should be able to find your card via the `lspci` command.
❯ lspci | grep -i tens
04:00.0 Processing accelerators: Tenstorrent Inc Grayskull
Congratulations! You have successfully installed the kerenl module for your Tenstorrent card.
Installing management tools (tt-smi and tt-flash) and updating the firmware
Now let's setup the enviroment. Let's install the dependencies and a virtual python enviroment. I am using micromamba instead of conda. You can use conda if you want. Just Mamba is MUCH faster then conda. You can safely skip the Python stuff if you intend on doing only C++ development.
Getting Micromamba and dependencies
Here is the official guide if you want to read more about it.
"${SHELL}" <(curl -L micro.mamba.pm/install.sh)
Now install system level dependencies and the virtual enviroment.
sudo pacman -S gcc cmake ninja git python python-pip rust cargo git-lfs
micromamba create -n tt-metal
micromamba activate tt-metal
micromamba install pip python==3.10 numpy # needed to make all packages happy
Installing tt-smi and tt-flash
tt-smi is the fansy `nvidia-smi` for Tenstorrent cards. tt-flash is the tool to flash the firmware on the card. You'll need both of them to manage your card. The flashing tool is easier to install. Just run the following command.
pip install git+https://github.com/tenstorrent/tt-flash.git
To install the tt-smi tool, clone the repository and install it via pip.
git clone https://github.com/tenstorrent/tt-smi
cd tt-smi
pip install .
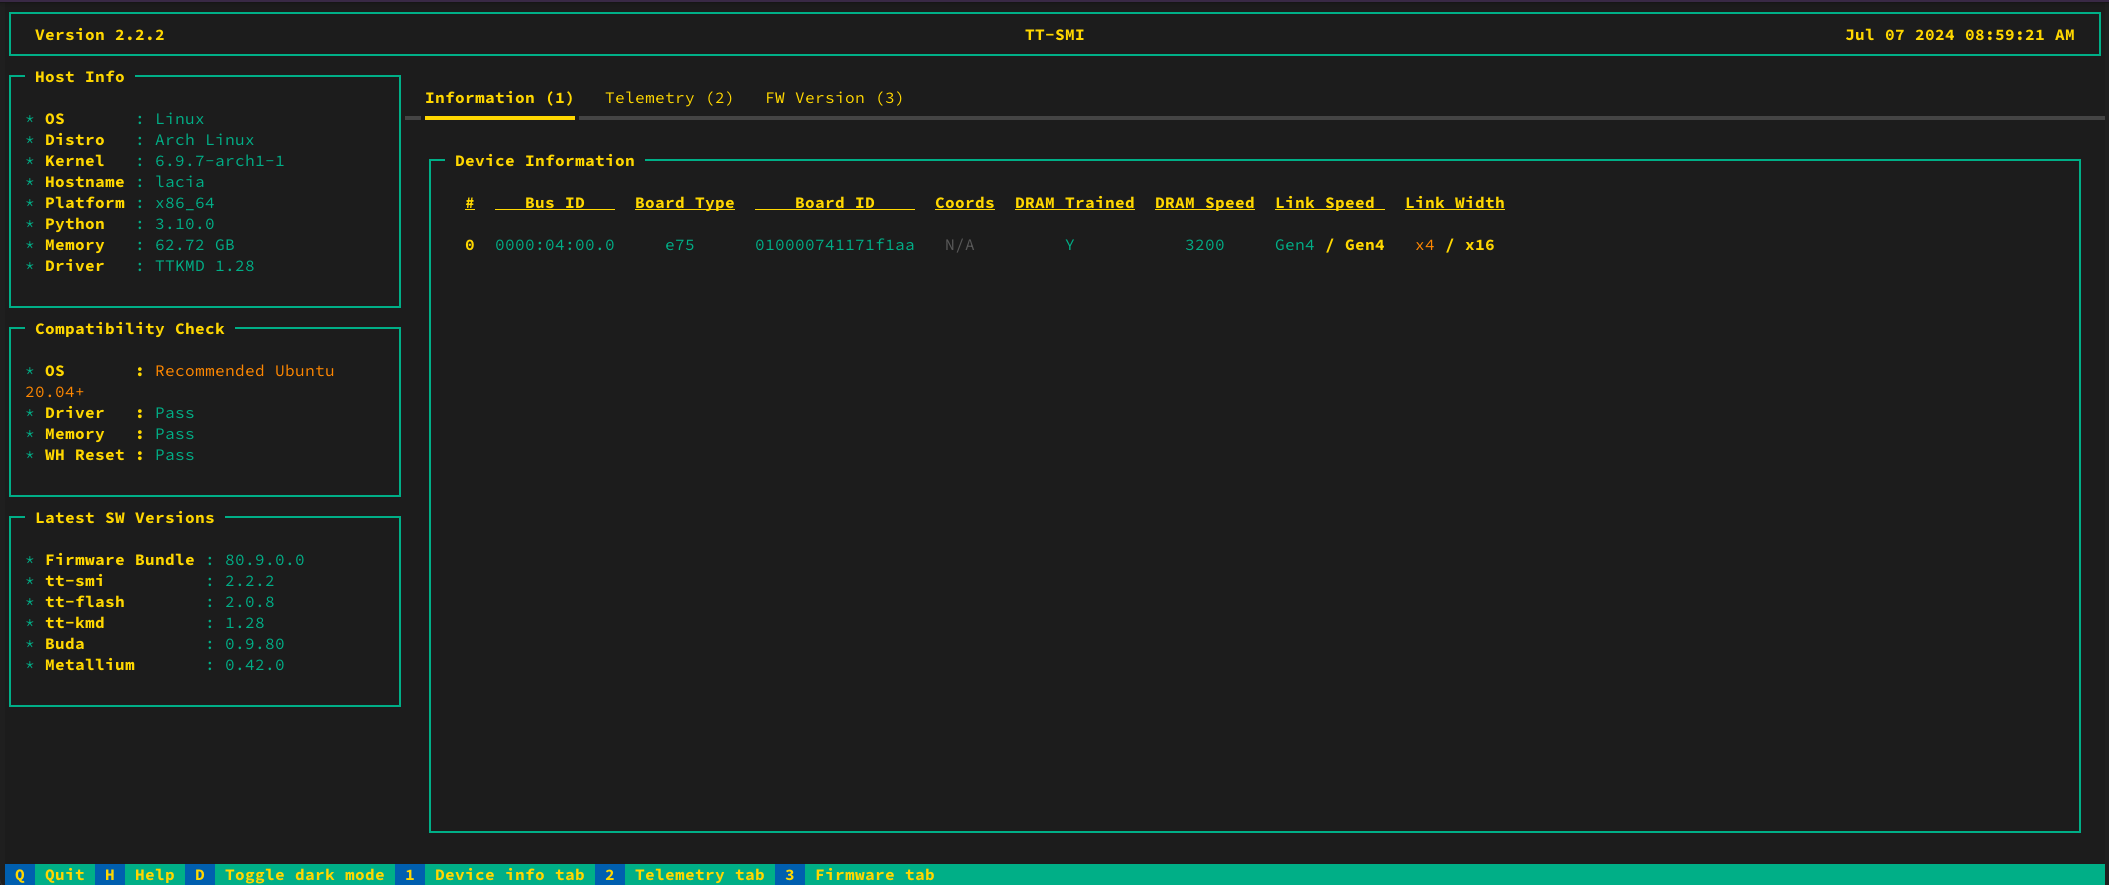
`tt-smi` is truly a beautiful piece of TUI.
Firmware update
With both tools installed, you can now update the firmware on your card. To do this, clone the `tt-firmware` repository and run the following command (NOTE: **Read the README before running the commands, it might have changed since I wrote this guide**).
git clone https://github.com/tenstorrent/tt-firmware
cd tt-firmware
tt-flash fw_pack-80.9.0.0.fwbundle
Building the SDK from source
Now let's setup the SDK. Unfortunately, it is not ready to become a system package yet, so you have to build it manually. Before that, let's install the dependencies and a virtual python enviroment. I am using micromamba instead of conda. You can use conda if you want. Just Mamba is MUCH faster then conda. You can safely skip the Python stuff if you intend on doing only C++ development.
Enabling hugepages
tt-metal needs huge pages to wrok. The simplest way is to use Tenstorrent's helper scripts. Run the command:
wget https://raw.githubusercontent.com/tenstorrent/tt-metal/main/infra/machine_setup/scripts/setup_hugepages.py
sudo -E python3 setup_hugepages.py first_pass
And reboot. You should see an additional 1GBs of memory used at idle. That's the huge pages. Also run `sudo -E python3 setup_hugepages.py check` to make sure everything is working. Alternatively, you can cat `/sys/kernel/mm/hugepages/hugepages-1048576kB/nr_hugepages` and the number should be greater than 0. _You will need one huge page per devivce you have._
Building tt-metal
First let's install all the dependencides. You want to use python 3.10 as some dependencies are not compatible with 3.12 that Arch ships. And you MUST have the virtual enviroment activated when building the SDK. Else it links with the system's Python and you'll have to rebuild the entire SDK to fix it.
Clone the entire repository (this will take a while as it also pulls in an entire RISC-V GCC via LFS).
git clone https://github.com/tenstorrent/tt-metal.git --recurse-submodules
cd tt-metal
git submodule foreach 'git lfs fetch --all && git lfs pull'
Then we can build the SDK. I strongly recommend to _not_ use the included script as (as of writting this post) it forces use of libc++ which is not compatible with the rest of the system. Instead, use the following commands. The only reason they default to libc++ is to use all of C++20 in Ubuntu 20.04.
cd tt-metal
export ARCH_NAME=grayskull # Replace this with `wormhole_b0` if you have a Wormhole card
export TT_METAL_HOME=$(pwd)
export PYTHONPATH=$(pwd)
mkdir build
cd build
cmake
cmake .. -DCMAKE_C_COMPILER=gcc -DCMAKE_CXX_COMPILER=g++ -DCMAKE_BUILD_TYPE=RelWithDebugInfo -DCMAKE_EXPORT_COMPILE_COMMANDS=ON
make -j8

# Install the SDK (it just installs everything to the "build/bin" directory)
cd ..
cmake --build build --target install
Now with the SDK built. Use the built in script to create a virtual enviroment. This will create a venv in `./python_env`.
./create_venv.sh
To test if everything is working. Run the following commands.
python
>>> import ttnn
>>> device = ttnn.open_device(0)
                 Device | INFO     | Opening user mode device driver
2024-07-07 08:56:43.047 | INFO     | SiliconDriver   - Detected 1 PCI device : [0]
                  Metal | INFO     | Initializing device 0. Program cache is NOT enabled
                  Metal | INFO     | AI CLK for device 0 is:   1000 MHz
And... you are done! Happy messing with the device and AI hacking!
Activating the virtual enviroment
In the future, you can activate the virtual enviroment by running the following commands.
cd /path/to/tt-metal
export ARCH_NAME=grayskull # Replace this with `wormhole_b0` if you have a Wormhole card
export TT_METAL_HOME=$(pwd)
export PYTHONPATH=$(pwd)
micromamba activate tt-metal
source python_env/bin/activate
Tips and tricks
Resetting the card (in case you hanged it)
`tt-smi -r <card_id>` will reset the card. You can find the card ID via `tt-smi -ls`.
❯ tt-smi -ls
 Detected Chips: 1
 Detecting ARC: |
 Detecting DRAM: |
 [] ETH: |
Gathering Information ━━━━━━━━━━━━━━━━━━━━━━━━━━━━━━━━━━━━━━━━ 100% 0:00:00
                All available boards on host:
┏━━━━━━━━━━━━┳━━━━━━━━━━━━┳━━━━━━━━━━━━━━━┳━━━━━━━━━━━━━━━━━━┓
┃ Pci Dev ID ┃ Board Type ┃ Device Series ┃ Board Number     ┃
┡━━━━━━━━━━━━╇━━━━━━━━━━━━╇━━━━━━━━━━━━━━━╇━━━━━━━━━━━━━━━━━━┩
│ 0          │ grayskull  │ e75           │ 010000741171f1aa │
└────────────┴────────────┴───────────────┴──────────────────┘
                  Boards that can be reset:
┏━━━━━━━━━━━━┳━━━━━━━━━━━━┳━━━━━━━━━━━━━━━┳━━━━━━━━━━━━━━━━━━┓
┃ Pci Dev ID ┃ Board Type ┃ Device Series ┃ Board Number     ┃
┡━━━━━━━━━━━━╇━━━━━━━━━━━━╇━━━━━━━━━━━━━━━╇━━━━━━━━━━━━━━━━━━┩
│ 0          │ grayskull  │ e75           │ 010000741171f1aa │
└────────────┴────────────┴───────────────┴──────────────────┘
❯ tt-smi -r 0
 Starting tensix reset on GS board at pci index 0
 Lowering clks to safe value...
 Beginning reset sequence...
 Finishing reset sequence...
 Returning clks to original values...
 Finished tensix reset on GS board at pci index 0

 Re-initializing boards after reset....
 Detected Chips: 1
 Detecting ARC: |
 Detecting DRAM: |
 [] ETH: |
Using the `sensors` command to view power and temperature
If you don't want to use tt-smi. The kernel driver exposes the power and temperature to the regular `sensors` command.
❯ sensors
...

grayskull-pci-0400
Adapter: PCI adapter
vcore:       740.00 mV (max =  +0.84 V)
asic_temp:    +49.3°C  (high = +75.0°C)
power:        18.00 W  (max =  56.00 W)
current:      22.00 A  (max = +170.00 A)

...