Here I'm republishing an old blog post of mine originally from August 2018. The article has been slightly improved.
The PacBSD project mentioned here does no longer exist.
A look beyond the BSD teacup: OmniOSce installation
Five years ago I wrote a post about taking a look beyond the Linux teacup. I was an Arch Linux user back then and since there were projects like ArchBSD (called PacBSD today) and Arch Hurd, I decided to take a look at and write about them.
Things have changed. Today I'm a happy FreeBSD user, but it's time again to take a look beyond the teacup of operating systems that I'm familiar with.
Why illumos / OmniOSce?
There are a couple of reasons. The Solaris-derivatives are the other big community in the *nix family besides Linux and the BSDs and we hadn't met so far. Working with ZFS on FreeBSD, I now and then I read messages that contain a reference to illumos which certainly helps to keep up the awareness. Of course there has also been a bit of curiosity - what might the OS be like that grew ZFS?
Also the _Ravenports_ project that I participate in planned to support Solaris / illumos right from the beginning. I wanted to at least be somewhat "prepared" when full support for that platform would finally land. So I did a little research on the various derivatives available and settled on the one that I had heard a talk about at last year's conference of the German Unix Users Group: "OmniOS - Solaris for the Rest of Us". I would have chosen SmartOS as I admire what Bryan Cantrill does but for getting to know illumos I prefer a traditional installation over a run-from-RAM system.
There was also a meme about FreeBSD that got me thinking:
Of course FreeBSD is _not_ run by corporations, especially when compared to the state of Linux. And regarding sponsoring OpenBSD also takes the money... When it comes to FreeBSD developers, there's probably some truth to the claim that some of them are using macOS as their desktop systems while OpenBSD devs are more likely to develop on their OS of choice. But then there's the statement that "every innovation in the past decade comes from Solaris". Bhyve alone proves this wrong. But let's be honest: Two of the major technologies that make FreeBSD a great platform today - ZFS and DTrace - actually do come from Solaris. PAM originates there and a more modern way of managing services as well. Also you hear good things about their _zones_ and a lot of small utilities in general.
In the end it was a lack of time that made me cheat and go down the easiest road: Create a Vagrantfile and just pull a VM image of the net that someone else had prepared... This was enough to just make sure that the Raven packages work on OmniOSce. I was determined to return, though - _someday_. You know how things go: "someday" is a pretty common alias for "probably never, actually."
But then I heard about a forum post on the BSDNow! podcast. The title "Initial OmniOS impressions by a BSD user" caught my attention. I read that it was written by somebody who had used FreeBSD for years but loathed the new Code of Conduct enough to leave. I also oppose the Conduct and have made that pretty clear in my February post. As stated there, I have stayed with my favorite OS and continue to advocate it. I decided to stop reading the post and try things out on my own instead. Now I've finally found the time to do so.
First attempt at installing the OS
OmniOSce offers images for three branches: _Stable_, _LTS_ and _Bloody_. Stable releases are made available twice a year with every fourth release being supported for three years (LTS) instead of one. Bloody images are more or less development snapshots meant for advanced users who want to test the newest features.
I downloaded the latest stable ISO and spun up a VM in Virtual Box. This is how things went:
Ah, the good old beastie menu - with some nice ASCII artwork! OmniOS used GRUB before but not too long ago, the FreeBSD loader was ported over to illumos. A good choice!
It looks like the team has created a new installer. I'm a curious person and want to know what it was like before - so I went with the old text-based installer.
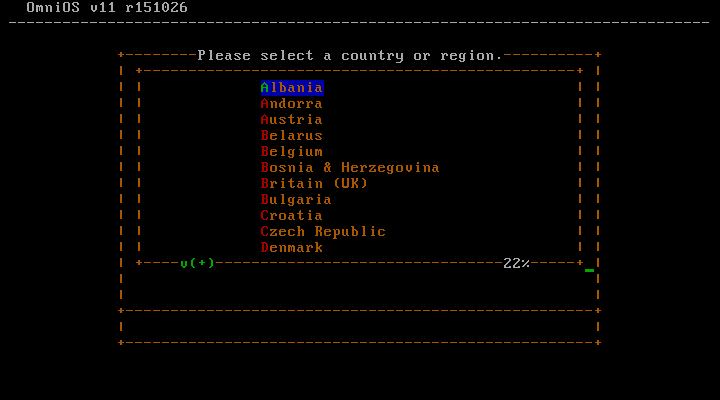
Not much of a surprise: The first thing to do is selecting the right keymap.
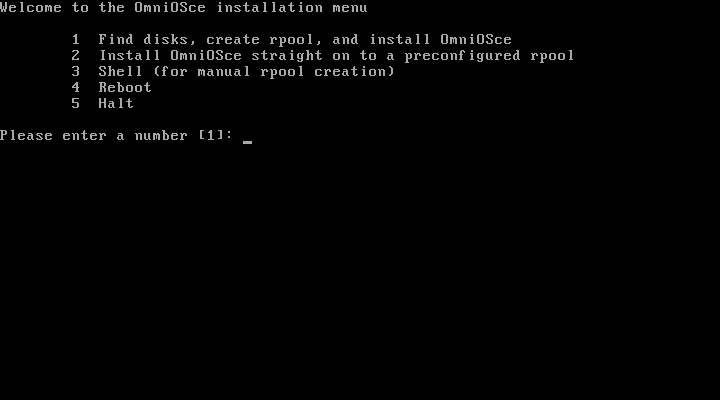
Ok, next it's time to create the ZFS pool for the operating system to install on. It seems like the illumos term is _rpool_ (which stands for _root pool_). Since I'm just exploring the OS for the first time, I picked option 1 and... Nothing happened! Well, that's not exactly true, since a message appears for a fraction of a second. If I press 1 again, it blinks up briefly again. Hm!
I kept the key pressed and try my best to read what it's saying:
/kayak/installer/kayak-menu[254]: /kayak/installer/find-and-install: not found [No such file or directory]
Oops! Looks like there's something broken on the current install media... So this was a dead-end pretty early on. However since we're all friends in Open Source, I filed an issue with OmniOS's kayak installer:
A developer responded the next day and the issue was solved. This left a very good impression on me. Quality in development doesn't show in that you never introduce bugs (which is nearly impossible even for really lame programs) but in how you react to bugs being found. Two thumbs up for OmniOSce here (my latest PRs with FreeBSD have been rotting for about a year now)!
Dialog-based installer
What a great opportunity to try out the new installer as well! Will it work?
Back on track with the dialog-based installer. Keymap selection is now done via a simple menu.
Ok, here we are again! Pool creation time. In the new installer it just does its job...
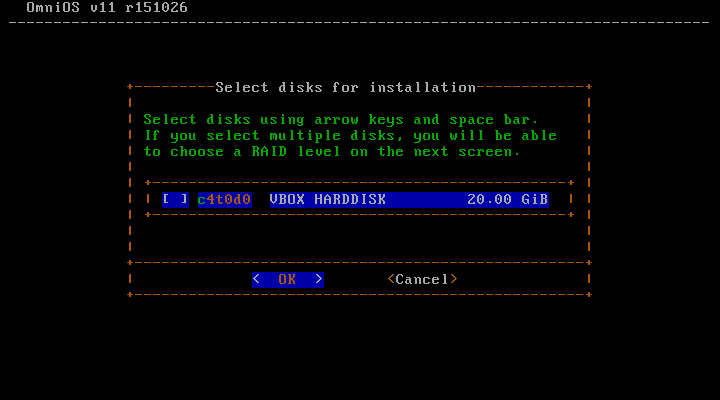
...and detects the drives, giving me a choice on where to install to. Of course it's a pretty easy decision to make in case of my VM with just one virtual drive!
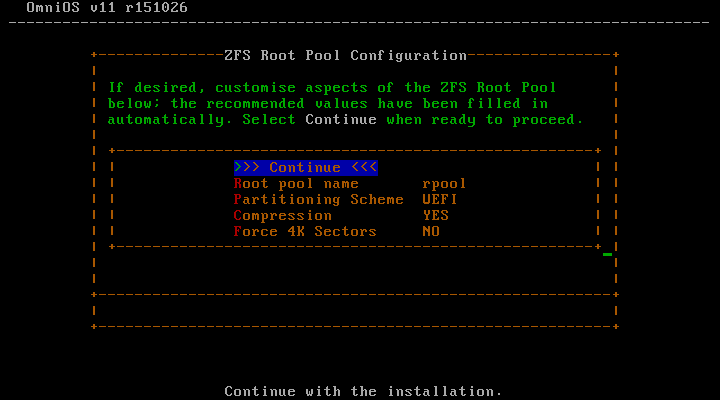
Next the installer allows for setting a few options regarding the pool. It's nice to see that UEFI seems to be already supported. For this VM I went with BIOS GPT, though.
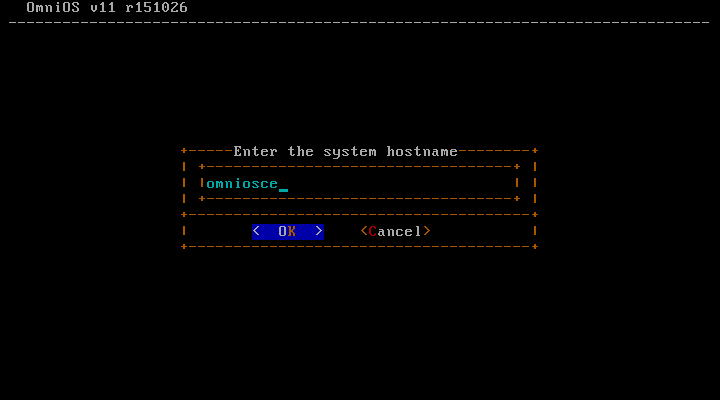
Then the hostname is set. For the impatient (and uncreative) it suggests _omniosce_. There's not too much any installer could do to set itself apart (and no need to).
Another important system configuration is time zone settings. Since there's a lot of time zones, it makes sense to group them together by continent instead of providing one large list. This looks pretty familiar from other OS installations.
The next menu allows for selecting the actual time zone.
Ok, a confirmation screen. A chance to review your settings probably doesn't hurt.
Alright! Now the actual installation of the files to the pool starts.
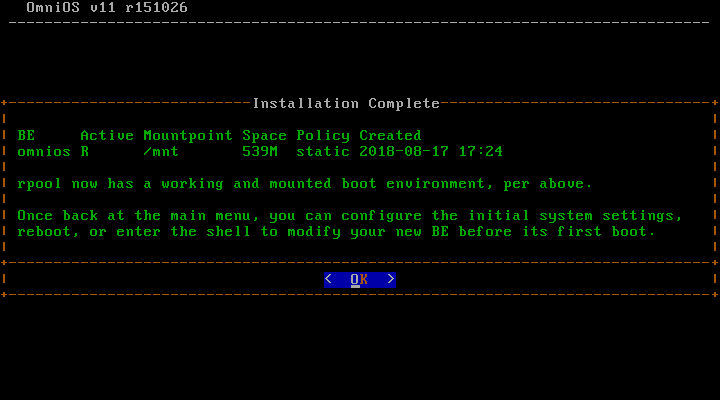
Just a moment later the installation is finished. Nice, it even created a boot environment on its own! Good to see that they are so tightly integrated into the system.
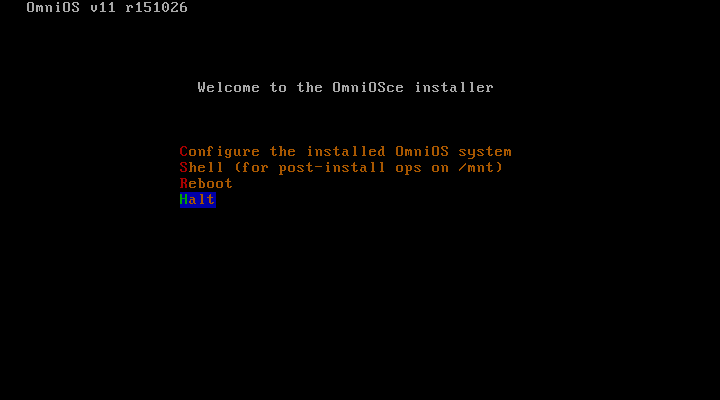
Finally it's time to reboot. The installer is offering to do some basic configuration of the system in case you want to do that.
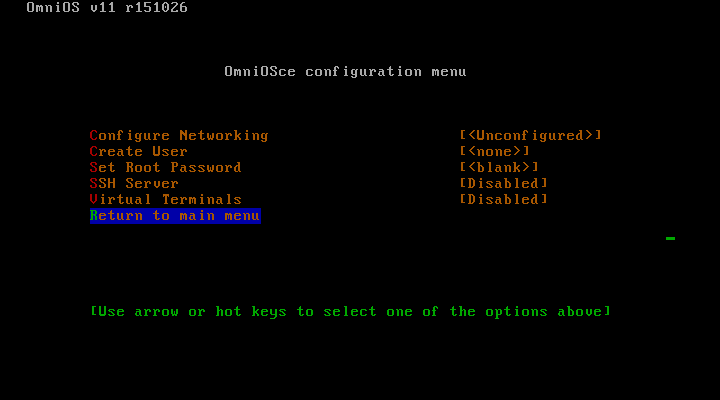
I decided not to do it as you probably learn most when you force yourself to figure out how to configure stuff manually. Of course I was curious, though, and took a peek at it. If you choose to create a user (just did this in another VM, so I can actually write about the installer), you'll get to decide if you want to make it an administrative user, whether to give it sudo privileges and if you want to allow passwordless sudo. Nice!
After rebooting the text string "Loading unix..." made me smile and I was very curious about what's to come. On the first boot it takes a bit longer since the service descriptions need to be parsed once. It's not a terribly long delay, though.
And there we have it, my first login into an OmniOSce system that I installed myself.
What's next?
That's it for part one. In part two I'll try to make the system useful. So far I have run into a problem that I haven't been able to solve. But I have some time now to figure things out for the next post. Let's see if I manage to get it working or if I have to report failure!